Wednesday, July 30, 2008

The Never-ending Cake of Doom


We are actually in the middle of moving right now so forgive me if this post is a bit scattered. I made the cake pretty early in the month so I could pack up all my baking stuff. It’s way too hot here to bake!

So, I planned on stretching this over 2 days, but it was actually more like 3 days. I’ll be honest, I don’t like finicky multi-step cake recipes so this was a real challenge for me. I’ve never made buttercream before, or ganache, or cut my cake into layers. I thought it was all just too fussy.

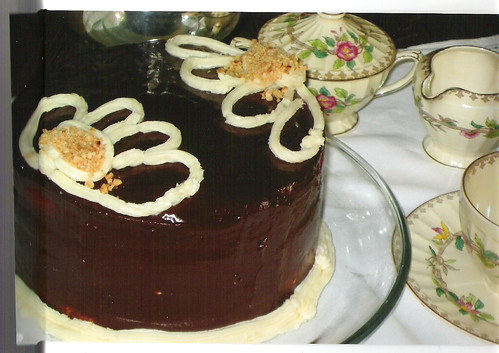
For my flavours, I went with hazelnut gateau, but added coconut to my praline paste (I’ll explain!) and used a watered-down maple syrup for my sugar syrup. Instead of apricot, I did a pear glaze. I ended up with not one, but TWO layers of ganache, one dark chocolate and one milk chocolate (more on that later).

Ok. First thing I made was the hazelnut praline. After roasting the beautiful hazelnuts and rubbing *most* of their skins off into the melted sugar they went. After it cooled I ran into my first glitch:


The praline almost destroyed my blender. It was a sticky, sugar-cement mess. I tried to unclog it by adding some coconut milk to loosen it up, which worked ok but I still ended up wasting a lot of the paste because it actually burnt to the blades the motor was getting so hot. Next tiem I will probably substitute this step with a blend of hazelnut butter (the real stuff, NOT Nutella!) and maple syrup.


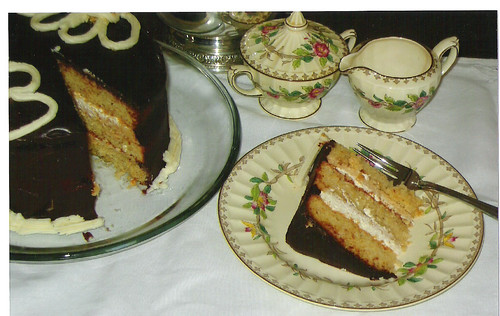
The genoise went really well. I used ½ cup ground hazelnuts that I already had in my fridge and substituted arrowroot for cornstarch. This part of the recipe was a bit confusing for me and I ended up clanging around with far too many different bowls, but I figured it out anyway. I made half a recipe and split the batter between two 6” springform pans. I was very happy with how it baked and how fluffy it was!


Then onto the swiss buttercream disaster. Looking back, something may have gone awry at the whisking over simmering water stage, but I’m not sure. At the time I thought it looked OK. It may also have been that my butter was too soft. After a 3-4 rounds of beating/chilling I gave up. I kept thinking “this stupid stuff is just filling anyway, who cares if it’s lumpy?!” But my perfectionism got the better of me and after reading through the DB forum and seeing how hard everyone was working to get this stuff right I vowed to fix my buttercream. But at this point I was totally exhausted and decided to take that project on the next day.


Day 2 I reheated my buttercream and whisked until I thought my arm was going to fall off. Then I chilled it and whisked some more. And it worked!!!! I was thrilled. Time to get this bad boy cake assembled. I used the toothpick method for slicing the genoise. I really didn’t think that the cake needed the whipped cream layers, but I did it anyway. I put some vanilla in the whipped cream for extra pizzazz since I omitted all the liquors in the recipe.


I used Green&Blacks dark chocolate for the ganache, and everything seemed fine until the very end when it started to separate. I think it was too much stirring. I admit I was anxious the get this cake finished. It wasn’t very thick either. I should have let it cool a bit more, but never having worked with ganache before I didn’t really know the consistency I was aiming for. It turned into a sticky drippy mess. Instead of throwing the cake out the window in frustration, I took a deep breath and put it back in the fridge overnight.

Day 3 I made a ¼ recipe of the ganache, this time with Green&Blacks milk chocolate. Yum! This one worked much better, although it was still a bit runny when I poured it over top of the defective ganache. The final cake was very yummy. I froze ½ to have with my parents while they are helping with the move.

My First Challenge – Filbert Gateau with Praline Buttercream

Filbert Gateau2-RobinV

I had a lot of fun making the Filbert Gateau and have a LOT of respect for all of the Daring Bakers who meet the challenge each month! Since this is my first challenge, I decided to stick to the recipe and not make any major “artistic” changes. I also was determined to make each and every part myself (no pre-ground nut flours for me ). I used dark rum in the sugar syrup and Amaretto liqueur in the Praline Buttercream, the Swiss Buttercream, the Whipped Cream and the Ganache. I used ½ orange marmalade and ½ apricot preserves for the Glaze. I appreciated the detailed instructions and each part came out very well. I got so excited once I had the ganache made that I forgot to put on a final layer of buttercream and whipped cream on top of the apricot glazed top layer of cake.

The dark chocolate glaze was so beautiful! I have never been a big cake decorator and had only two tips to go with my pastry bag – I gave it a shot but my buttercream decorations just are not the best. Again, kudos to those who have learned how to decorate well!

Filbert Gateau-RobinV

Now to the taste – I wish I could say I loved it – but the flavors and texture of the cake just did not float my boat. It was very good, but I’m pretty sure I’ll never make it again. I know I will make the ganache and swiss buttercream again. It just didn’t have a lot of ooommmppphhh – pretty subtle flavors. I was expecting more flavor from the praline butter cream! I like that it was not overly sweet as a whole. I loved the texture combo of the praline buttercream and whipped cream layers.

I can’t wait to work on August’s challenge!

- Robin

My Review of the Filbert Gateau with Praline Buttercream

I was nervous about this challenge and actually put it off as long as I could! I've made cakes in the past with this many steps, as I did actually go to school for baking & pastry arts, but it's been a few years and they were always done in a nice, big, professional-style kitchen...not a 1-bedroom apartment-style kitchen with a husband and cat :) Finally, I got home last night, realized I already had most of the ingredients and set out to complete the entire challenge, start to finish, before midnight...and I'm proud to say, mission accomplished! Each step was easier than I imagined, but that's not to say there weren't some questionable moments.

laura

I decided to bake my cake in two 9" round pans and torte each one, for a 4-layer cake...however, the cakes baked sooo quickly, which I think lead to them being a little overbaked and really difficult to remove from the pans. Thus, I wound up with approximately 3 layers in the end...I say "approximately" because I haven't sliced it yet and have no idea what that will result in.

Otherwise, I followed the recipe fairly closely, using almonds and raspberry preserves, in place of hazelnuts and apricot. I also left out the alcohol flavorings this time around.

Also, because my layered cake looked so lumpy, due to trying to repair cracked layers, I coated the cake in the raspberry glaze, refrigerated for about 15 minutes, coated again with a thin layer of the praline buttercream and then refrigerated for another 20 minutes before glazing with the ganache.

A silly prep mistake I made was simply toasting the almonds for the cake and then realizing I needed to toast more almonds for the praline paste - the could've saved me some time.

With the praline, I was so worried about burning my sugar, that I used a pan that may have actually been too thick because it took so long for the sugar to melt - then, I turned away for 2 seconds and had a really dark caramel, which I luckily retrieved just in time - the praline came out really good and the paste was really easy to prepare. This cake has reminded me that making caramel is much less scary than I always make it out to be in my mind.

I do wish I had taken more time to be creative with my decorating, but as I mentioned, I waited until the last minute to complete the challenge and knew I wouldn't have much time after yesterday to complete it, so it was best done the same day.

My finished cake photo is attached - I haven't gotten a slice photo yet because I plan on bringing it into work tomorrow for our July birthday breakfast - mmmm, cake at 10:30 AM - but I will hopefully get another pic before it's gone.

I think that's it. I hope it's not too long...I tend to be quite wordy :)

I look forward to August's challenge!

Laura - LuckyCupcake

Thursday, July 24, 2008

Is it greedy to eat the WHOLE braid?!?!

O.K., I didn't eat the whole thing but I must admit, I was tempted to. This is a great recipe that I hope to make again.

I had my laptop nearby to the YouTube video on making Danish pastry. I wanted to make sure that I did the butter block was done correctly. I was very happy with the results (even if it wasn't a perfect square):

I followed the recipe almost exactly and used the Apple Filling but I added a cream cheese layer along with it. Since I didn't want to mess up on the actual braiding part, I totally did a knock off of Button's danish braid because it looked so pretty (thanks, Button!).

I'm very happy with how it turned out. I did have some butter leakage as I was rolling my dough out pretty vigorously and some apple spillage during baking but no harm done (thank goodness for Silpat). This was one of the tastiest things I've ever made and I'm very proud of myself. Thanks, Daring Bakers!


Wednesday, July 2, 2008

Danish Braid


I'll was pretty excited about partaking in this challenge. The only experience I have with yeast is using a bread maker - and I usually still manage to screw it up somehow.

I really enjoyed making the dough with my KitchenAid mixer - although I'm not sure the mixer was quite capable of handling the dough. It was shaking the entire table! I didn't have any problems rolling the dough. On day 2, when I was going to roll out my braid and fill and bake it - I ran into some issues. I was not able to roll the dough out to the 15 x 18 size, so I did a smaller roll. I chose to make the almond strawberry filling that was used by another one of the DB's. I still had 2 cups of almond meal in my kitchen from the opera cake, so I thought why not? I was originally going to fill with creamcheese and chocolate chips - but I will save that for another time.


I let the bread proof for two hours - but I'm not sure it rised as it should have. After baking the braid, it did not look as flaky as I would've liked. I would like to try this again sometime to see if I have better luck with the yeast rising.